
How To Make A Trendy Quilt Coat
Quilt Coats are making a comeback as sewists, new and seasoned alike, strive to find creative avenues that also lend themselves to the environmentally conscious mindset. Where quilts are likened to a warm hug, quilted garments bring that embrace up to a whole new level.
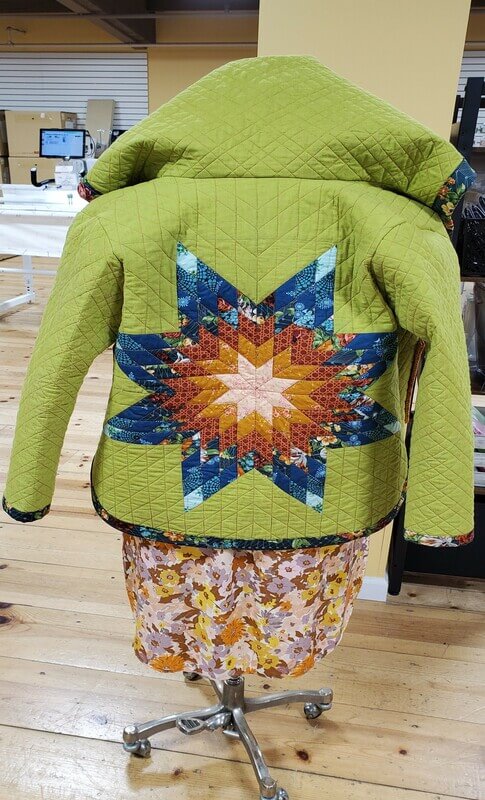
You can grab an old quilt, orphan quilt blocks, or create something new from scratch to turn into a custom jacket created to fit just your style. We’re here to show you how easy it is to make a stylish quilt jacket even if you’ve never sewn a garment before.
Materials Needed To Make A Quilt Coat
If you are used to making quilts or clothes at home, you may already possess many of these materials. If this is your first project, however, don’t worry! They can usually be found at most craft stores or online
This list is a suggestion, as your specific project may have extra necessary supplies depending on how complex of a design you choose to do! Suggested supplies for making a jacket made from a quilt include:
- A pattern: Unless you are an expert with years of experience under your belt, you are probably going to need to follow a pattern in order to make a quilt jacket that fits correctly. Using a pattern helps immensely to prevent waste or mistakes. Currently popular in our shop is the Tamarack Jacket
- Sewing machine: Although many projects can be made by hand, it is highly recommended to construct your garment by machine. You may also consider using a heavy-duty needle for joining pieces together.
- Fabric: Your customer jacket can be made from an old quilt you have or you can create your pieces from scratch using orphan blocks (blocks that never made it into a project) or use
- stabilizers to sew together designs that can be set into the jacket pieces. Having fabric with a pattern you love is essential! If you are choosing to make your coat from the very beginning with new fabric, you will need to prewash these pieces before construction. It is recommended to use a zig-zag stitch on the edges to keep it from fraying prior to washing.
- Thread: You will want to choose a thread that coordinates with your project- if you are quilting your own panels you may want a different color for quilting rather than construction. We also recommend using a polyester thread for the longevity of your garment.
- Pins or Wonderclips: You will absolutely want to have straight pins and wonderclips on hand for attaching the pieces together- we don’t want any shifting! You may also want curved basting pins if you are making your coat pieces from scratch.
- Measuring Tape: You will want a measuring tape for not only measuring yourself but also checking your pieces and ensuring they are the correct sizes.
- Scissors and Snips: You will need scissors for cutting out pattern pieces and cutting fabric. It is also good to have snips on hand for cutting threads as you go.
- Rotary cutter and cutting mat: A rotary cutter and cutting mat are usually a staple in any sewing room but if you are just beginning this is a good basic that is worth the investment. It makes cutting pieces out a breeze. We recommend using a 45mm Olfa cutter and at least an 18″ x 24″ cutting mat if not larger. You may also want a seam ripper because let’s face it, mistakes happen!
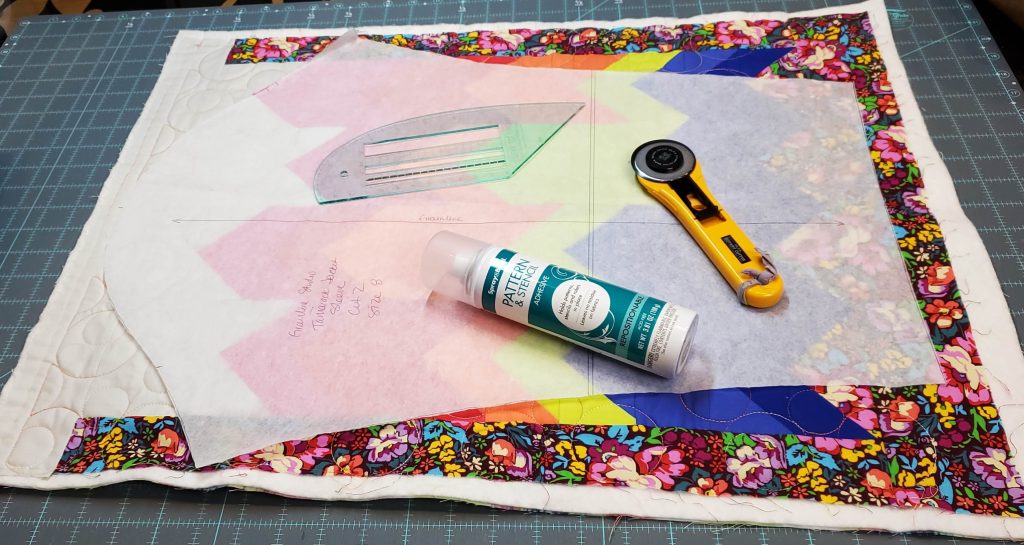
- Pattern Weights or Temporary Adhesive: While both tools provide the same service, you may find that each works better in certain applications. You will want to anchor your pattern pieces down while you cut each one out of your fabric, so anything heavy enough to keep your pattern from moving works wonderfully. If you are working in a small space, the adhesive can really ensure that nothing shifts while you are cutting.
- Closures: You may choose to add your preferred method of closure to your coat, such as buttons, clasps, snaps, etc. Depending on what you choose, you will need to prepare your coat accordingly – planning buttonholes especially. Many also opt to leave their finished garment in more of a “chore style”, with no closures.
- Fashion Multi-Tool: The Fashion Multi-Tool is a great tool created by Sew to Grow. This tool can be used for marking your patterns and also for cutting out your pattern pieces.
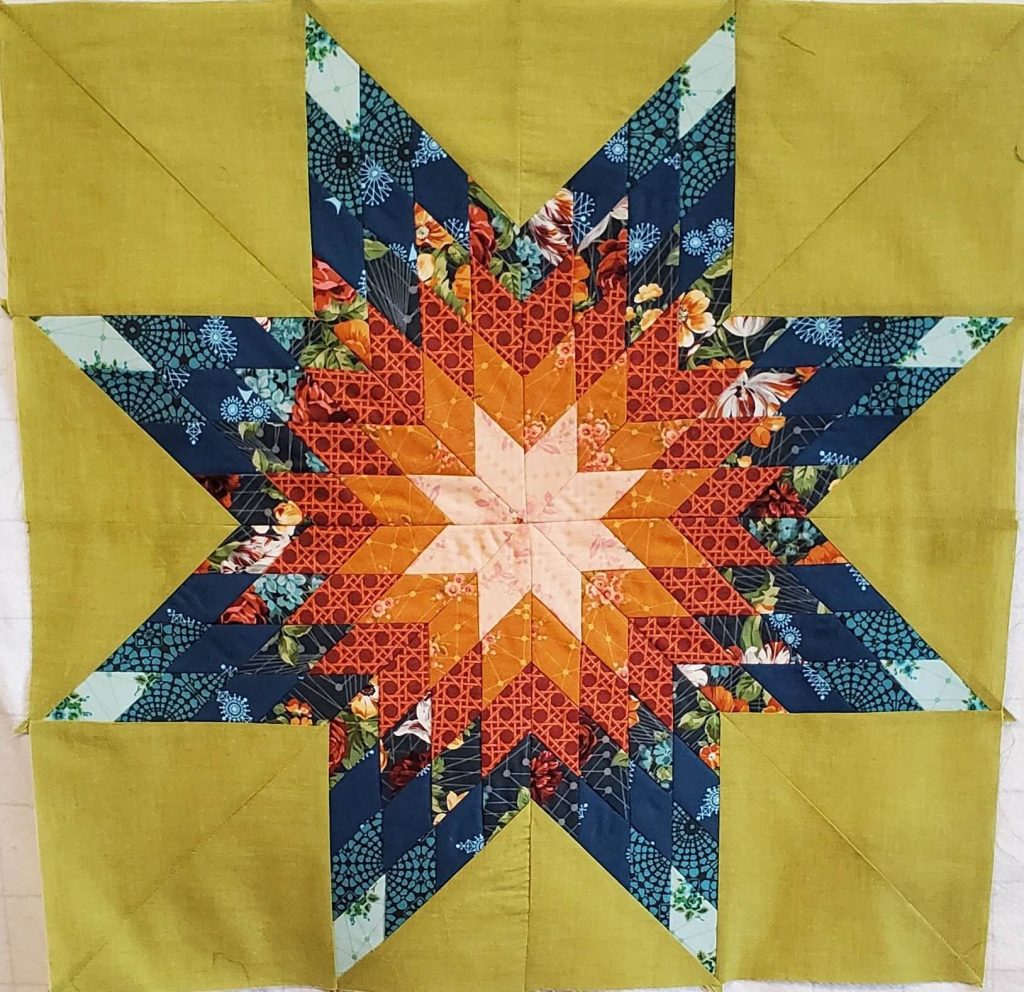
- Decorative elements: We highly encourage adding pieced blocks into your panels if you are creating your quilted garment from scratch.
Making A Jacket Out of A Quilt
Now that you have collected all the necessary materials, you are ready to begin the process of making your garment.
Let’s get started:
- Measure, Measure, Measure!: We can not stress enough the importance of measuring yourself and following the size suggestions on the pattern. Just like clothing at the store no two measurements fit the same, Take the time to measure yourself before starting, There are directions on your pattern as to where on your body to measure, and we highly recommend this tutorial by Sew to Grow for self measuring, as well as the measuring tape that they have created.
- Trace your pattern: Garment patterns come with a range of size options within one pattern. We recommend tracing your size onto Pattern-Ease or Swedish Tracing Paper to preserve the master copy of the pattern for future use in different sizes.
- Check to verify your fabric quantities: If you are creating your garment from an already made quilt, you will want to lay out your pattern pieces and ensure that you will be able to cut the pieces you need out of what you have available. If you do not, it is absolutely possible to make those other portions out of new fabrics. If you are making your coat from scratch, you will want to pre-wash your fabrics at this step.
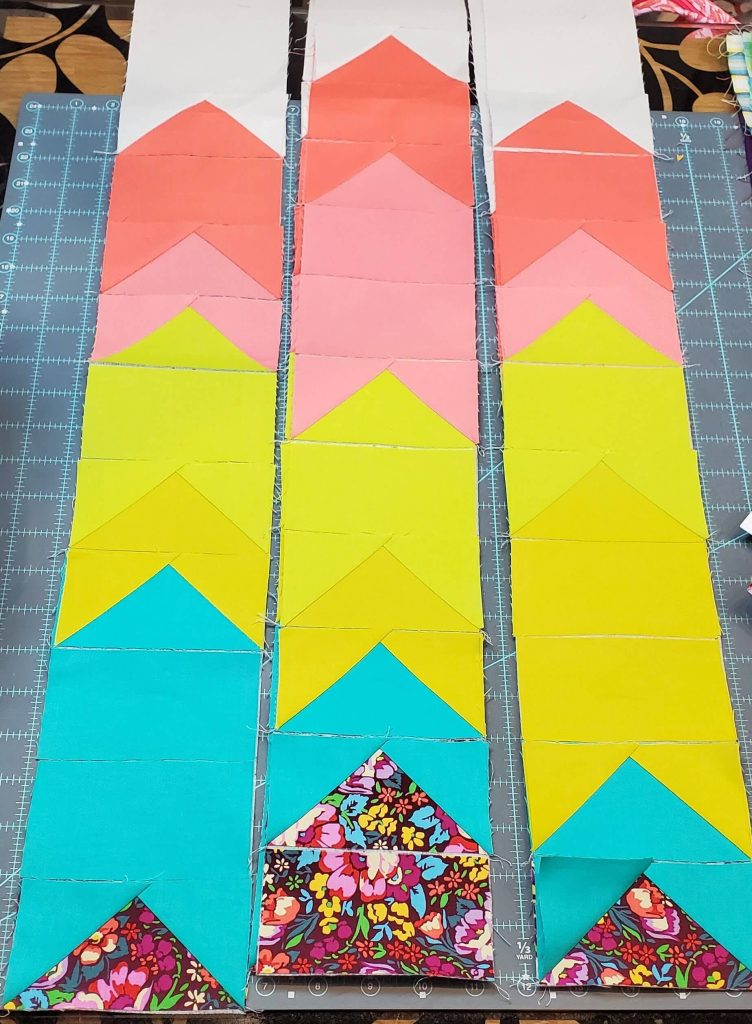
- Creating your own fabric pieces: If you want to create your own pieces for your jacket or place a block(s) into your custom jacket now is the time to create those pieces. You will need to create your custom panels (Fabric piece, usually rectangular, made larger than the pattern piece by several inches) that you will then cut your pattern pieces from. Remember to make your panels larger than the pattern pieces so you have room to cut everything out.
- How to inset a block into a panel: Measure what size panel you will need by measuring the length and width of your pattern piece and add 2″-3″ to each side. Measure the block you want to set into the panel. Subtract block size from the panel size and this is the amount of fabric you need to add to the block to make it be the size of panel you need.
- Quilt your fabric pieces: If you are using the Tamarack Jacket pattern you can use pre-quilted fabric or quilt your own. Their instructions have you quilt your pieces after you have cut them out. I found it easier to work with all the pieces be quilting all my panels prior to cutting them out so I didn’t have to worry about too much shrinkage after cutting to my fit. If you want to quilt prior to cutting then I recommend you create “panels” for each piece you need and quilt them with your designed design now.
- Lay out your pattern pieces: You will want to pin, use pattern weights, or use the temporary adhesive spray to anchor your pattern pieces to your fabric before you cut.
- Cut your pattern pieces out: The pattern you chose should come with specific instructions on how to cut out your fabric pieces, so be sure to carefully adhere to them as you sew everything together. It is also highly recommended to read through the pattern fully before starting, to ensure no important steps get missed.
- Assemble the coat pieces: Follow the pattern instructions on how to assemble the quilt coat. When picking out a pattern, verify it comes with clear instructions you can follow easily. Every jacket is different, and having the quilted jacket pattern plainly written is very important in order to smoothly finish.
- Embellish: Add any decorative elements as well as the closures
Tips For Your Quilted Coat Journey
Here are some quick tips to hopefully ease your coat-making process and make your quilted jacket more stylish and comfortable.
- Pay attention to the pattern. Keep an eye on directional prints- make sure everything is going in the same direction! You will want to consider this when choosing fabrics- will it be possible to line up patterns in a way that will be visually pleasing and intentional?
- Keep extra fabric just in case. It can never hurt to purchase a little bit of extra yardage, in case you need to lengthen or adjust your pattern to fit.
- Need inspiration? Check out Instagram hashtags such as: #quiltcoat, #qmquiltcoatchallenge, #freespiritcoatstory, #quiltjacket, #Quiltsmart, to see all the ideas other people have used.
- Join our Facebook group! For videos, tips, and tricks to make your quilt coat join our private Facebook group, QM Quilt Coat Sew Along.
A quilted jacket is a wonderful project to undertake. It can be used to refresh a special quilt, make a lovely gift for someone else, or simply improve your creative skills. Hopefully, these instructions and tips are helpful, and good luck!
If you would like an extra challenge, Quilting Mayhem is hosting a Quilt Coat Challenge! Any coat can be entered in the contest if it has been created using Quilting Mayhem fabric. This is a fantastic opportunity to practice your skills, challenge yourself, and… there are some prizes! If you are interested in joining the contest, you can read the full list of rules here.
Show us what you made! Share your creation and tag us on Facebook and Instagram using #qmquiltcoatchallenge, #quiltingmayhem, #mayhemmaker, #embracethemayhem.